The Gray Pixel
Bryce Tutorial - Working Telescope
The model is a little tricky to set up, so for the purpose of this tutorial I am going to provide all of the sizes and coordinates of primitives used within the scene. This will save you a couple of hours of trial and error trying to get the focus right. Also I would love to explain how a Refraction Telescope works during this process, but I will not since there are entire books out there on the subjects of lens making, refraction telescopes etc.
STEP 1: Create New Scene
Open Bryce and create a new project. The document size does not matter. For my project the document dimension were 720 x 540.
STEP 2: Create Objective Lens
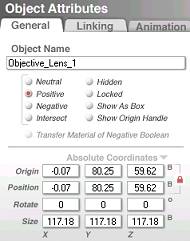
Add a new sphere to the project. The name of this sphere will be 'Objective_Lens_1'. Objective_Lens_1 will be located at (0, 80.25, 59.62). The dimensions of this sphere will be (117.18, 117.18, 117.18). Finally click on the 'Positive' radio button.
You should have something like this:
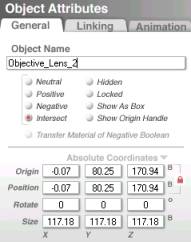
Add another sphere to the project. The name of this sphere will be 'Objective_Lens_2'. Objective_Lens_2 will be located at (0, 80.25, 170.94). The dimensions of this sphere will be (117.18, 117.18, 117.18). Finally click on the 'Intersect' radio button.
You should have something like this:
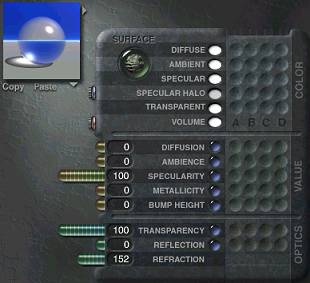
Select both spheres that you have just created. Now click on the 'M' to open the Materials Lab. Go to 'Glasses' and select 'Standard Glass'. If you do not have this material in your presets then use the following settings to create the material.
With both spheres still selected now click on the 'G' to group the two spheres. With one sphere set to positive and the other set to intersect you will create a very nice convex lens. You may not see it well during rendering due to the glass texture, but if you want to see the result of the boolean operation change the spheres material properties to something other than glass and render. You should see a nice convex shape.
STEP 3: Create The Eyepiece
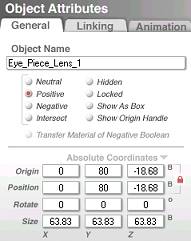
Add a new sphere to the project. The name of this sphere will be 'Eye_Piece_Lens_1'. Eye_Piece_Lens_1 will be located at (0, 80, -18.68). The dimensions of this sphere will be (63.83, 63.83, 63.83). Finally set the click on the 'Positive' radio button.
You should have something like this:
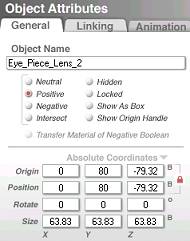
Add a sphere to the project. The name of this sphere will be 'Eye_Piece_Lens_2'. Eye_Piece_Lens_2 will be located at (0, 80, -79.32). The dimensions of this sphere will be (63.83, 63.83, 63.83). Finally click on the 'Intersect' radio button.
You should have something like this:
Select both spheres that you have just created. Click on the 'M' to open the Materials Lab. Go to 'Glasses' and select 'Standard Glass' or use the material settings from the previous step.
With both spheres still selected now click on the 'G' to group the two spheres. With one sphere set to positive and the other set to intersect you will create a very nice convex lens.
STEP 4: Create The Target
In this step we will add a simple target for our telescope to view. For my scene I applied a texture that resembles the moon. Apply something that will make the scene interesting.
Add a sphere to the scene. The sphere will be located at (0, 80, 283.65). The dimensions of the sphere are (3, 3, 3).
Now apply any texture that you wish. Make sure it is something that has some interesting patterns or texture.
STEP 5: Establishing The Viewing Angle
This is the part that about drove me through the roof. Something interesting about trying to get the camera view lined up with the lenses. As you view the lenses through the nano preview, the window can not render the light passing through the lenses. Once we get the camera lined up with the lenses, the nano preview for the lenses will appear black.
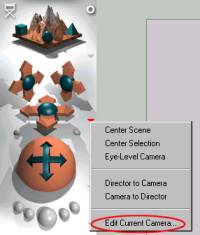
Open the 'Edit Current Camera' dialog box. You can get to this by click on the arrow next to the XZ Camera Control and then select 'Edit Current Camera'.
Set the camera position to (0, 80, -109.56). Set the camera rotaion to (0, 0, 0). Click on the check mark. If everything is setup correctly you should see the spheres lined up and the 'Target' should be roughly in the center of the screen. If not go back and check everything to make sure you have alignment. If everything is good, and before you do anything else select one of the Memory Buttons to save the current viewing angle. If you don't you will have a hard time getting the camera in the proper position.
I have provided the location of the eyepiece and the camera so you will not have to go through the trial and error of trying to find the right location to bring the target into focus. Later if you to experiment with the focus you can link the camera to the eyepiece so as you move the eyepiece close or farther from the objective lenses you will not have to move the camera in order to get the right viewing angle.
STEP 6: Render And Enjoy
If you render the scene you should see a much large image of the 'Target' appear on the screen. If you want to see the differences, you can select both lens groups and 'Hide' them. Render the scene. The 'Target' will appear to be a small dot in the scene. Unhide the lenses and render and you can see the magnification in action.
STEP 7: If All Else Fails
If for some reason the above does not work then click on the link to download a copy of the Bryce file used to make this tutorial.