The Gray Pixel
Tutorial - DAT2DXF Converter Setup
Setting up and using the DAT2DXF converter is pretty simple. The first thing that must be done is to set the path to your LDRAW directory. In the sample screenshot I have hilited the section in where the LDRAW directory is set. In the case of my machine I have my LDRAW directory located under another folder called Lego_Apps.
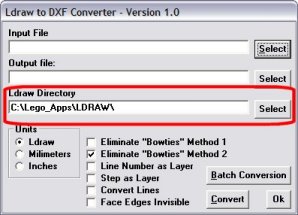
When setting the path you can either enter the path in the text box or you can use the 'Select' button located to the right of the 'Ldraw directory' text box. When using the 'Select' button to browse for the path you must browse to and select the LDRAW.EXE file on your machine. This will ensure that you have the proper path selected.
Ok, now the DAT2DXF converter can reference the parts and models folders located in the LDRAW folder. This is very important if you have models that contain sub-models. For example, you are building set 1461. As you build the model you create a sub-model for the wheels. This is cool, you save time and have a reusable model. Now the problem, if you try to use the DAT2DXF tool with this model the software will stop during the conversion with an error about a missing file. The source of the problem is that the DATDXF tool looks for all parts in either the parts or models folder in the LDRAW folder. So to convert your car model you would need to move your wheel sub-model to the models folder. Now with the wheel sub-model in your models folder the DAT2DXF tool will convert your car model without any problems.